
Welcome to Efficient Aluminum Mining in Dune Awakening
If you've unlocked your legendary buggy and are entering the aluminum phase of your Dune Awakening journey, this guide will show you exactly where and how to farm aluminum efficiently. Whether you're in it to save time, maximize output, or just want smarter routes, these tips are designed to help you make every run count. From the best routes to key upgrades and essential mining tips, let’s dive in.
Why the Eastern and Western Shield Walls Are the Best for Aluminum
Both the Eastern and Western Shield Walls are home to high-density aluminum deposits. These areas provide consistent node spawn points and make for reliable aluminum runs. If you’re mining in Hager Basin, there's no better place to start.
How to Access Shield Wall Aluminum Zones
There are only three reliable entry points into the Eastern and Western Shield Walls:
-
The top-right corner of Oadam
-
The Mysar Terrell entrance
-
Near Pinnacle Station
Aside from those, players can use an ornithopter or equip a rattle boost to fly or carry aluminum manually. But for regular farming, these three entries are the most practical.

Minimum Gear for Aluminum Mining
To get started:
-
Buggy: At least a Buggy Mark III
-
Cutter Array: Preferably a Mark V
-
Storage: Buggy Storage Mark III or higher
These are the basic tools needed to complete a full aluminum run without needing to refuel or make multiple trips.
Understanding Node Respawns and Weekly Rotations
Each week, the Coriolis storm reshuffles node resources. About 80% of nodes retain their positions but swap resource types. That means a granite node today might become an aluminum one next week. A few nodes disappear temporarily but will reappear later.
The Importance of Learning Node Patterns
The node rotation isn’t random—it follows a set cycle. After a few weeks, routes repeat. This means you can learn and reuse efficient routes based on the rotation, giving you an edge as you progress through the game.
How Rotation Impacts Route Efficiency
Knowing the rotation helps you plan faster, shorter routes. Fewer detours mean quicker trips and more aluminum per hour. If your route aligns with the current spawn configuration, you’ll mine more nodes in less time.
Mining Yield Matters—Upgrade Your Planetologist Perks
Getting your Planetologist perks to Level 3 boosts mining yields by 20%. With the right perks and equipment, you can reduce the number of nodes needed per run drastically.
Gear Impact on Run Efficiency
Let’s look at numbers:
-
Without perks: You need 23 nodes to fill a 2,000-capacity boot.
-
With perks: Only 16 nodes needed for the same boot.
This can mean a significant difference in travel time and overall aluminum output.
Comparing Cutter Arrays and Storage Options
Here’s how gear changes affect efficiency:
-
Mark V Cutter + Mark V Boot (2,500 capacity): 14 nodes
-
Mark VI Cutter + Perks: Only 11 nodes
These upgrades can dramatically reduce time spent on each run.
Aluminum Yield Per Node and Refiner
On a large refiner, a Mark VI Cutter with Level 3 perks yields around 750 ingots per full run. Even with a medium refiner and older equipment, you can expect over 350 ingots. These numbers justify investing in the best gear early.
Running Mark VI Cutter on a Mark III Buggy
Using a Mark VI Cutter on a basic Mark III Buggy works surprisingly well. You may deal with more heat and wear, but if you're playing solo and manage your engine, you’ll barely notice the difference. Heat isn’t a major issue unless you're pushing nonstop.
Where to Find the Mark V Cutter Array
The best places to find a Mark V Cutter include:
-
Imperial Testing Station #60
-
Atreides Bases
-
Passage of Artamez
-
Aegis Station
-
Harkonnen Base
-
Heroes Testing Station #163
Farming these regularly will eventually yield the Cutter Array. You can also check the in-game store, where prices range between 50,000–80,000 credits.
How to Farm the Mark V Cutter Fast
If you’re aiming to farm the Mark V Cutter Array from the Atreides bases, use this method:
-
Land on the left side of the base.
-
Drop down twice, collect the band.
-
Double-jump, loot the chest.
-
Retrace your steps and escape via ornithopter (or on foot if needed).
This method takes under 30 seconds and can be done repeatedly. It’s one of the fastest ways to farm high-tier gear without crafting.
Top Route #1: Starting at Iron Watch
The most efficient aluminum run begins just below the Iron Watch, near the Crossroads Trade Post. This path includes multiple node clusters and is reliable across different rotations. Begin by heading north.
While the first two nodes can be hostile early-game, they’re manageable or skippable depending on your loadout. Past those, you’ll find five to six more nodes near Eve’s Triumph.

Continue the Route with Safe Clusters
After Eve’s Triumph, backtrack slightly and drop down to find another three nodes. From here, proceed northeast where additional nodes usually spawn. Depending on the rotation, you’ll see two more before climbing to a ledge with another two-node cluster.
This path ends with a final set of four consistent nodes near the cliff’s edge. Even during peak server hours, this route delivers enough to fill a Buggy Mark III with ease.
Why This Route Works So Well
The reason this first route is so efficient is simple—node density. You’re always within a short driving distance of another deposit. Plus, the elevation design makes travel smoother with fewer obstacles.
Even if a few nodes are missing due to other players, the total average remains high across weekly cycles. This makes it ideal for both solo and group farming.
Alternative Route #2: Loop Through the Hills
Begin at the same starting point, but instead of going straight, turn left and ascend through the tiered hills. This path offers more node diversity and avoids areas that are often contested by players.
Around the point of interest near the layered ramps, you’ll often find 4–5 aluminum nodes in rotation. This makes it a great Plan B if Route #1 is crowded.
Scaling Higher Terrain for More Deposits
Continue climbing and you’ll reach more spread-out deposits. Though you’ll drive a bit more between nodes, you’ll gain access to three concentrated nodes near the cliff and another two shortly after.
Some areas here tend to generate aluminum more frequently, so it’s worth scouting every week post-storm reset.
Route Merge Strategy for Low-End Cutters
If you're using a basic Cutter Array like the Mark III or IV, you can merge Route #2 with the lower section of Route #1. After reaching the top in Route #2, turn left instead of right, and loop back down.
This increases your chances of fully loading a lower-capacity boot, even with weaker mining yields.
Additional Nodes Along the Secondary Path
Along this second route, you’ll occasionally find clusters of 3–4 nodes just off the main trail. They’re often skipped by other players, making them low-competition and efficient for quick mining.
As always, yield varies per storm cycle, but the general layout remains predictable.
Finishing the Route with a Full Load
Once you've looped back into the original run’s final node cluster, you can head straight out or double back to refill in missed spots. With a 2,500-capacity boot and perks active, one complete loop is usually enough.
These paths are flexible, and rotating between them keeps your runs optimized even during peak hours or heavy farming times.

Eastern Shield Wall Tips
While Western routes are easier to navigate with vehicles, the Eastern Shield Wall has larger node clusters. However, many of these are located on difficult terrain—elevated rock formations and cliffs—making vehicle access tricky.
Hand-mining or precise driving helps here, but for aluminum-specific runs, Western routes remain more vehicle-friendly.
Best Base Locations for Quick Access
If you're setting up a base, consider these high-access areas:
-
Western Shield Wall edge (near Oadam)
-
Pinnacle Station outskirts
-
Mid-slope Mysar Terrell zones
These locations let you hit top routes in under 3 minutes travel time.
Beginner Tip: Mining Before Buggy Unlock
If you’re still building your first buggy, you can mine aluminum by hand using a sandbike and Cutter Mark III. A couple of full runs will get you enough to craft a basic vehicle and begin farming properly.
Mix and Match Gear Early for Better Results
If you're just starting out, don’t wait to get the perfect buggy. You can run a Mark VI Cutter Array on a basic Mark III buggy just fine. It may overheat slightly, but if you toggle the engine off between stops, it performs almost as well.
Heat buildup isn't a major concern for solo players, and this combo allows you to farm aluminum at high efficiency early on.
Where to Farm Aluminum Without Upgrades
If you haven’t unlocked a buggy or high-tier equipment yet, head to:
-
Southern edges of the Eastern Shield Wall
-
Perimeter of Oadam’s entrance zone
-
Shallow cliffs near Pinnacle Station
These areas are more accessible by sandbike and offer decent aluminum density for beginners looking to gather early resources.
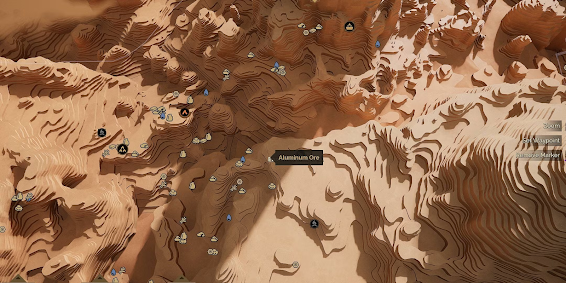
Aluminum Node Density Map Highlights
These are the highest-density, vehicle-accessible areas to focus your runs on:
-
Zone between Iron Watch and Eve’s Triumph
-
Elevated cliffs west of Mysar Terrell
-
Outer eastern wall near Pinnacle Station
-
Circular valley route around the Aegis zone
Focusing your farming runs in these zones ensures maximum returns without wasting time searching for sparse deposits.

Maximize Your Aluminum Farming in Dune Awakening
Aluminum farming in Dune Awakening doesn’t need to be time-consuming or inefficient. With the right setup—Mark V Cutter, at least a Mark III buggy, and Level 3 Planetologist perks—you can cut your node requirements in half. Combine that with well-planned routes in the Western and Eastern Shield Walls, and you’re guaranteed to get the most out of every run.
The Coriolis storm rotations may alter node types each week, but the locations mostly stay the same. Learn them. Optimize for them. And repeat the best paths as patterns emerge. Whether you’re starting out on a sandbike or fully geared with a legendary buggy, the strategies in this guide will boost your aluminum yield and cut your farming time dramatically.
Frequently Asked Questions
Q: What’s the best location to mine aluminum in Dune Awakening?
A: The Eastern and Western Shield Walls are the top regions due to high-density aluminum nodes and easy farming routes.
Q: How do I access the Shield Wall areas?
A: There are three entry points—Oadam (top-right), Mysar Terrell, and Pinnacle Station. You can also fly or boost in with gear.
Q: What’s the ideal setup for aluminum mining?
A: A Buggy Mark III or better, Mark V Cutter Array, and Buggy Storage Mark III are recommended. Level 3 Planetologist perks further improve efficiency.
Q: Do node locations change?
A: Yes, nodes rotate weekly with the Coriolis storm. However, 80% of them retain the same positions and only change resource types.
Q: How many nodes do I need per run?
A: With no perks, about 23 nodes. With full perks and top gear, as few as 11 are needed for a full load.
Q: Can I run a Mark VI Cutter on a basic buggy?
A: Yes. It works fine with minor overheating. Solo players can toggle the engine between stops to manage heat.
Q: Where can I get a Mark V Cutter Array?
A: Check Imperial Testing Station #60, Atreides bases, Heroes Testing Station #163, and the in-game marketplace.
Q: Is there a beginner method for farming aluminum?
A: Yes. Use a sandbike and a basic Cutter to hand-mine until you gather enough to build your first buggy.
Stay Connected with Haplo Gaming Chef
Haplo Gaming Chef blends gaming guides with casual cooking streams for a truly unique viewer experience. Whether you’re here for clean, no-nonsense walkthroughs or just want to chill with some cozy cooking content between game sessions, this is the place for you. From full game unlock guides to live recipe prep and casual chats, Haplo Gaming Chef delivers content that’s both informative and enjoyable.
You Can Follow Along On Every Major Platform:
YouTube, Twitch, TikTok, Instagram, Twitter/X, Threads, Bluesky, Pinterest, Flipboard, Facebook, LinkedIn, Tumblr, Medium, Blogger, and even on Google Business.
No filler, no fluff—just straight-up help for gamers and fun for foodies. Join the community today!
For More Guides Visit: Haplo Gaming Chef Website!


No comments:
Post a Comment